In this article we will walk through how to tack up your horse English, step by step! If you are a beginner rider you may have taken lessons and watched your instructor saddle up your horse. Or maybe you’ve helped tighten your girth but have never put the bit in your horse’s mouth. Once you start to get comfortable with grooming and handling your horse on the ground your horseback riding instructor will likely have you move on to tacking up. There is a lot of equipment to get familiar with! And learning how to attach all of the straps and buckles can be confusing.
Plus, putting your tack on and adjusting it correctly will help keep you safe during your ride. If you are new to tacking up, always have your instructor check your tack and equipment before mounting your horse for your lesson.
This post may contain affiliate links which means that I may earn a small commission at no extra cost to you. As an Amazon Associate I earn from qualifying purchases.
Groom Thoroughly
The first and most important step when learning to tack up your horse correctly, is to thoroughly groom your horse. It’s important to remove any caked on mud, dirt or other debris before placing your saddle or bridle on the horse. This way you will avoid rubs, skin irritation and discomfort to your horse.
If you want to check out my full grooming routine, read this article!
Daily Grooming Routine Your Horse Will Love!
To summarize, you will need to curry comb your horse followed by a hard brush and soft brush to clean their hair before putting any equipment on. You will also need to pick your horse’s hooves out thoroughly before riding!
If you’re still learning how to pick up and clean out your horse’s hooves, check out this article!
How To Pick Your Horses Hooves Correctly
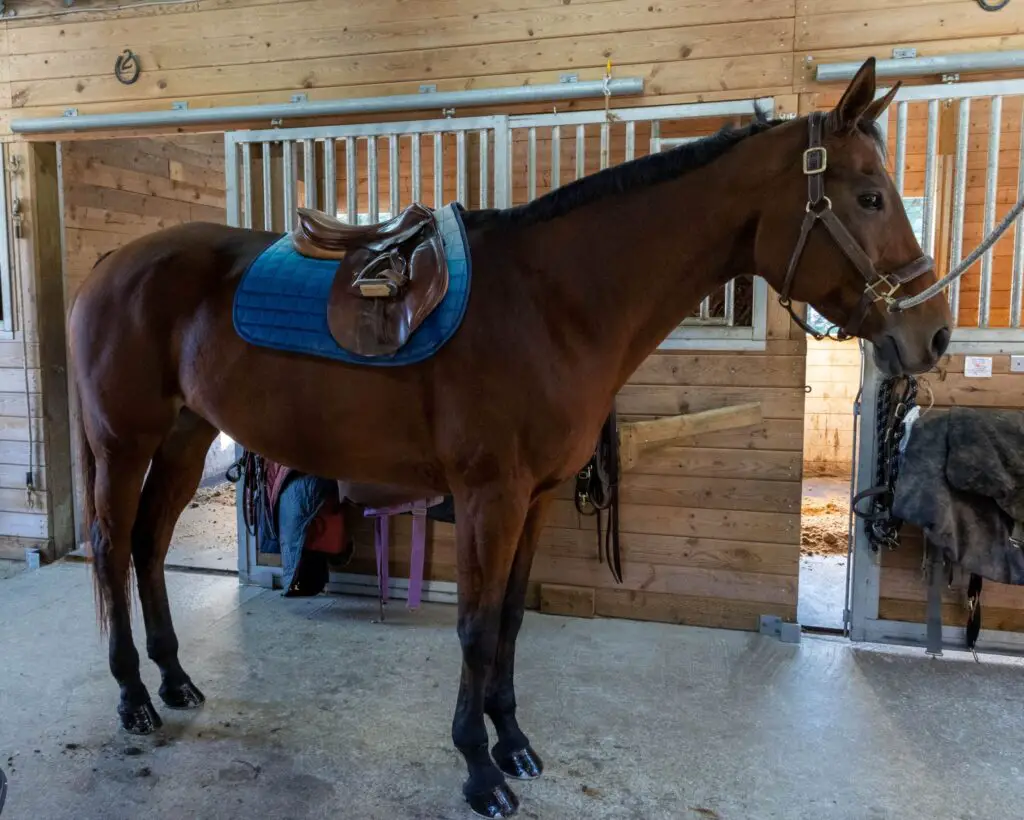
Saddle Pad
The next step in tacking up your horse is put your saddle pad on. Some riding instructors may have you use a square quilted saddle pad followed by a gel pad or half pad on top, depending on the horse you’ll be riding. Be sure to check with your instructor about which equipment is appropriate for your horse that day.
Place the saddle pad gently onto the horse’s back with the front of the pad sitting just above the mid-point of the horse’s withers. Most English saddle pads have keepers (velcro straps) at the front to help hold it in place. This will help you identify which end of the pad is the front.
It may be tempting to smooth out the saddle pad by pressing it down onto the horse’s back, but this is not a good idea. Once you’ve placed the pad onto the horse’s back, just make sure it is straight. If it slips back and you need to move it forward, be sure to lift it up a little instead of sliding it so that you do not pull your horse’s hair against the direction it grows. This could cause discomfort to your horse while you are riding.

Saddle
Next it’s time to saddle your horse! When you learn how to tack up your horse for the first time, this can be a bit intimidating. First, your saddle may be stored in the tack room with a saddle cover. Remove the saddle cover from your saddle. Next, check to make sure the stirrups are still rolled up so they won’t hit the horse by accident.
Then, gently lift and place the saddle onto the horse’s back. If you cannot reach use a stool to ensure you do not drop the saddle onto the horse or hit them in the side which may be painful to them, horses are quite sensitive.
As you place the saddle onto your horse’s back, set it down very gently. Try to line it up with the pommel sitting directly over the horse’s withers. You should always have your horseback riding instructor check to make sure your saddle is placed correctly. If the saddle is too far forward or too far back it can be very dangerous. Your saddle could slip causing you to fall off or your horse to become injured.
Once the saddle is on in the correct position, pull the saddle pad up towards the pommel of the saddle. Make sure to pull up away from your horse’s withers. You should be able to fit your fingers in between the front of the saddle pad and the horse’s withers. It’s a good idea to do this before your girth is on and tight.
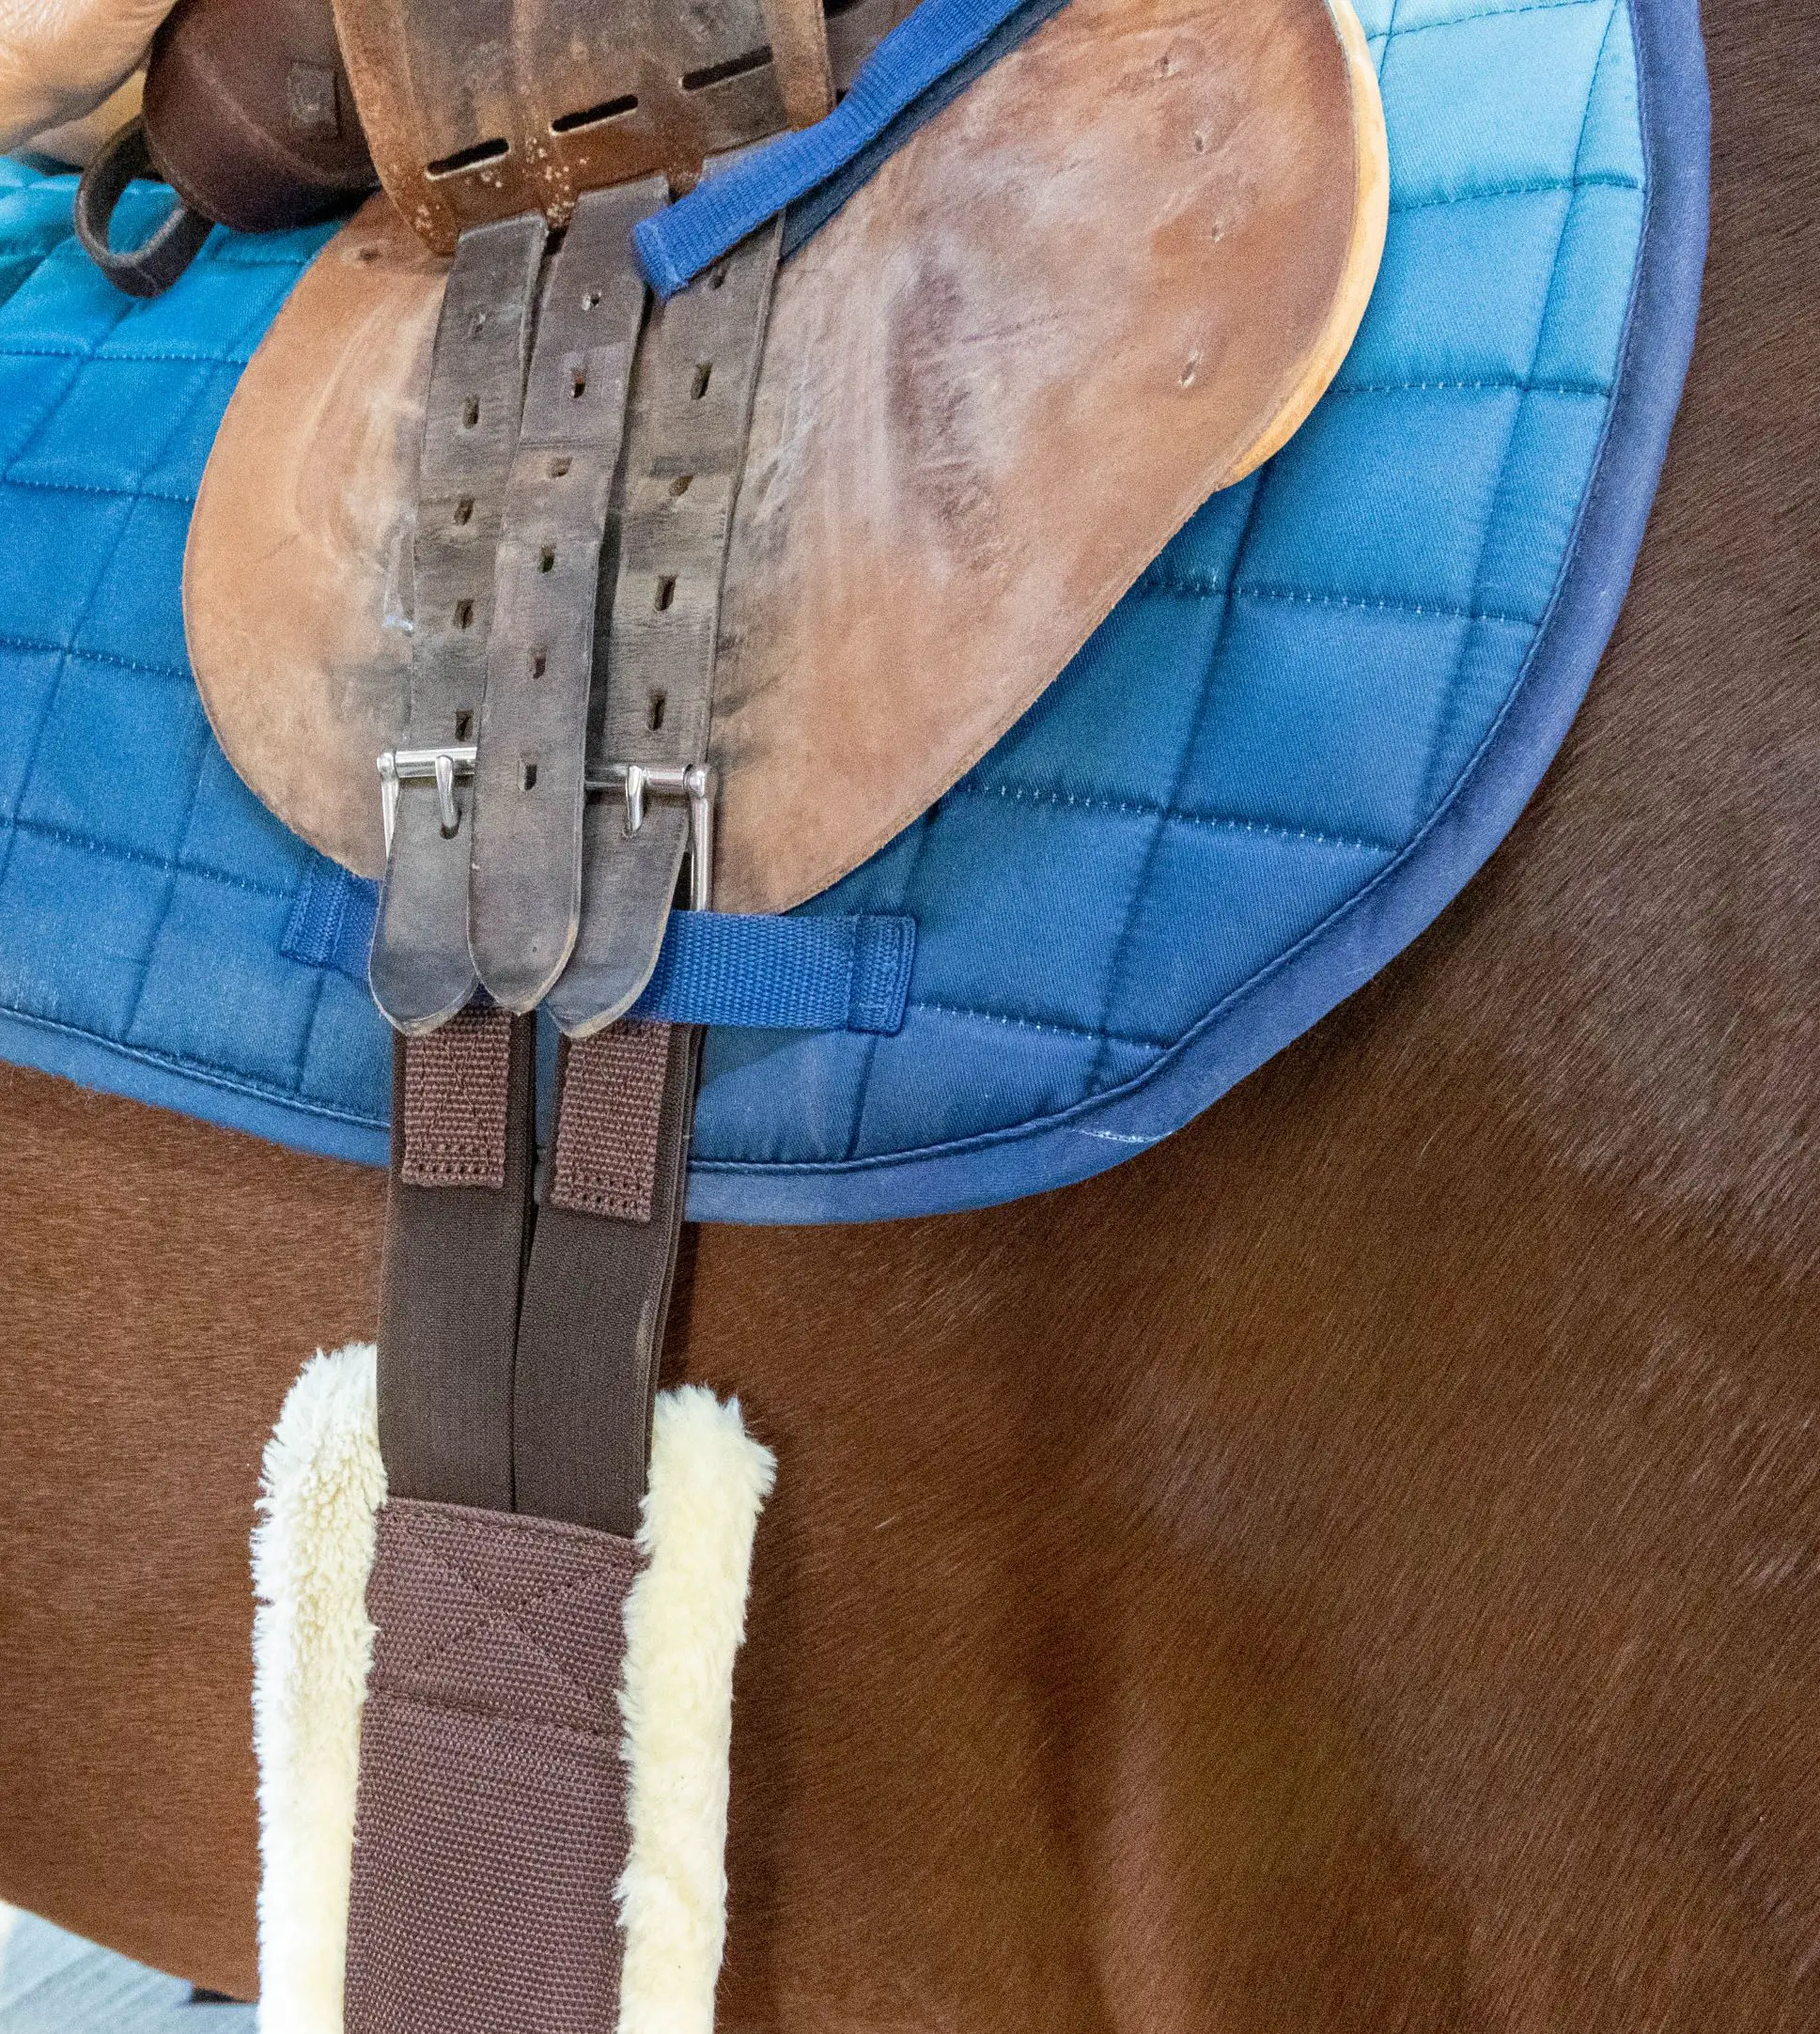
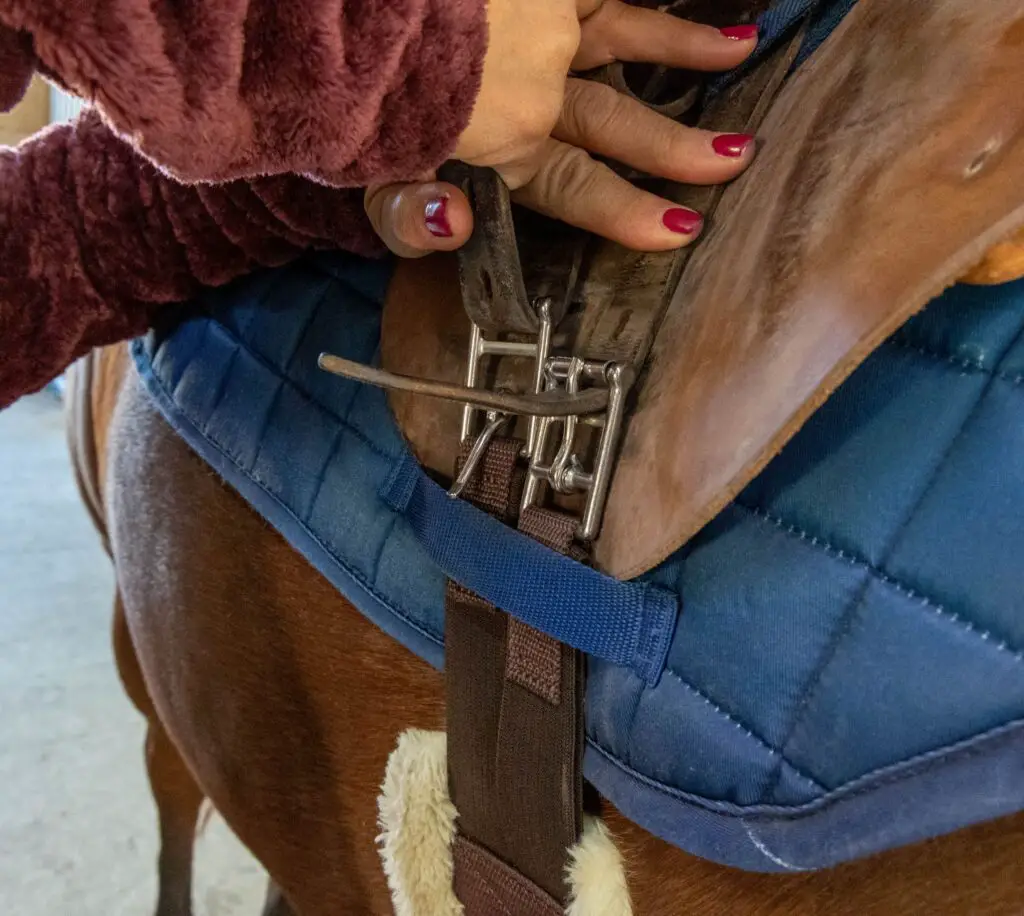
Keepers
Once your saddle pad and saddle are placed on the horse, next you will want to attach the keepers from the saddle pad onto the saddle. This will help hold your saddle pad in place and prevent it from sliding out from under the pad.
Martingale
There are different types of martingales but most commonly you may see a running martingale or standing martingale. A running martingale is placed around your horse’s neck, and sometimes attached to the D-rings on the front of your saddle. A running martingale has a fork with two metal rings. Each rein passes through the rings in order to help prevent the horse from putting its head up too high in the air. Most beginner safe lesson horses will not use this type of martingale.
A standing martingale will also be placed around your horse’s neck and may not attach to the D-rings of your saddle. Instead of a fork, a standing martingale will have a single piece of leather that attaches to the noseband of your horse’s bridle and to the girth on the other end.
Just like any other tack, your martingale needs to be adjusted correctly. It should be tight enough to stay in place but loose enough that it does not constrict your horse’s movement or cause discomfort.

Girth
Now, it’s finally time to put on your girth. Double check that your saddle has not moved. There are two ways to put your girth on when you tack up your horse English. However, regardless of which way you find easier for you and your horse, the elastic end of the girth always goes on the horse’s left side. This is so that the elastic is on the side the rider mounts from.
Your English girth may have elastic on both sides!
Method 1
The first way to attach your girth when you learn how to tack up your horse, is to buckle the girth on the horse’s right side, on the very first hole. Next, walk around to the other side of your horse, carefully reach under to grasp the girth and repeat the same process. Buckle the girth on the loosest hole. Next, walk back around to the horse’s right side and slowly tighten the girth. You can tighten the right side as much as you can.
The benefit of attaching both sides before tightening the girth, is that you won’t have to guess how tight or loose to put the girth on the first side, which is the horse’s right. And, you won’t struggle to attach the girth on the left hand side. Next, you guessed it, you’ll need to tighten the left side appropriately. It should be tight enough to keep the saddle in place but not so tight that your horse is uncomfortable.
I like to take my time and tighten the girth slowly. Usually, I will intentionally leave the left side a little bit looser than I need it in order to ride. Once I walk out to the arena, I will tighten the girth again. Once my girth is correctly tightened on both sides, I like to walk my horse in a circle before mounting, just to give him a chance to breath and adjust.
Method 2
The second way to attach your girth is to adjust the right side to the normal setting you put it on to ride, then attach the left side and tighten as needed. This is the way I was taught as a child, and some people feel that it minimizes the horse’s barrel being pulled from one side to the other. However, unless you are familiar with how the tack fits the horse you are riding, this can be a bit challenging.
How Tight Should The Girth Be?
It’s important to get your girth tight enough that your saddle won’t slide off. However, there has to be a balance because if the girth is too tight it could make your horse uncomfortable and can make it difficult for them to perform to the best of their ability. And, to complicate matters more, every horse is different!
I recently read an article about tightening girths correctly without over tightening them, and it was a great read! I’ve linked it below, and you should check it out!
Leg Protection
If your horse uses leg protection like splint boots, brushing boots or polo wraps, you’ll want to put those on next. Make sure your horse’s legs are nice and clean so no dirt gets trapped between the boots and your horse’s legs. If you are just learning how to tack up, you should have your riding instructor check to make sure your boots are on the correct direction!
Also, beginner equestrians are better off using boots rather than polo wraps for riding. It takes a lot of skill and practice to wrap a horse’s legs correctly. Wrapping a horse’s legs incorrectly can cause damage to the tendons and cause your horse to become lame.
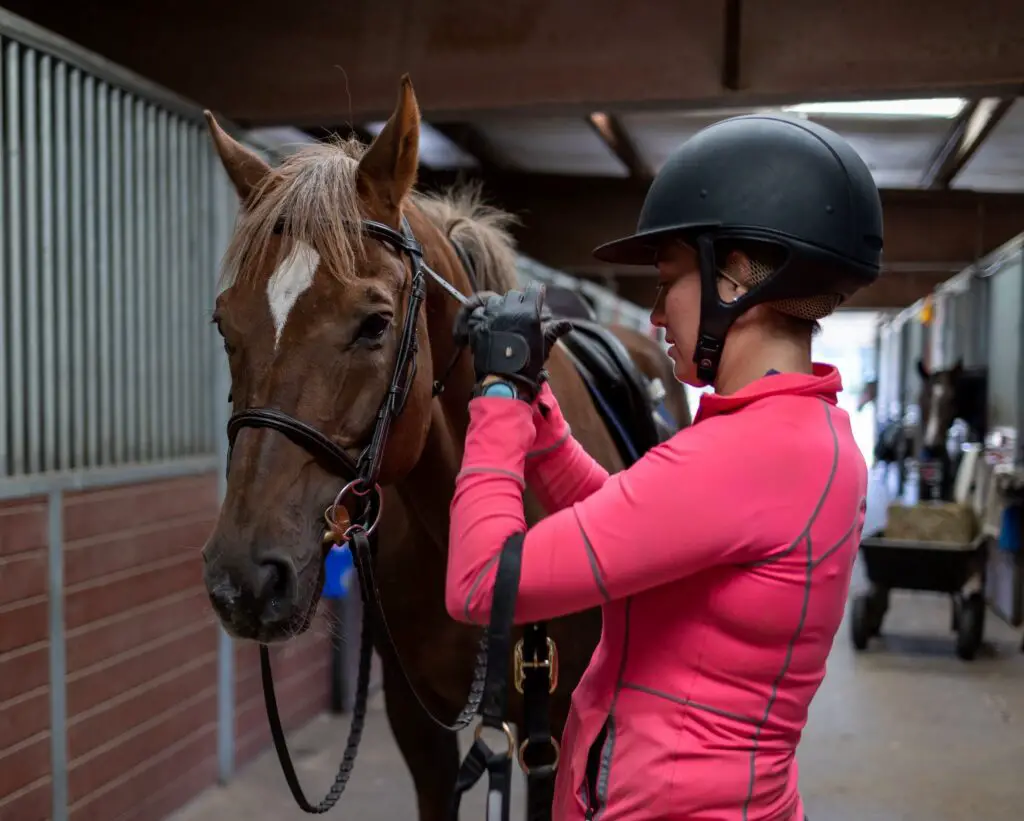
Bridle
And, lastly, it’s time for the bridle! At this point your horse should be clean, wearing his or her other tack and have been fly sprayed if necessary! Before you put your bridle on, it’s a good idea to put your helmet on and check for any manure that needs to be picked up. You should also sweep up any dirt from picking your horse’s hooves.
Before you bridle your horse, it’s a good idea to put the reins over your horse’s neck. This way, if your horse tries to make a quick escape after you’ve removed his halter, you’ll have a better chance of containing him.
Bridling a horse can be a challenge when you are learning how to tack up your horse, so be patient and ask for help.
Putting The Bit In Your Horse’s Mouth
Once you’ve placed the reins over your horse’s neck, stand next to your horse on his left side. Stand close to your horse so you can keep him from moving. Next, put your right arm under your horse’s throatlatch with your hand reaching around near his face. Hold the headstall of your bridle in your right hand and keep your left hand on the horse’s nose, not near his nostrils. Use your left hand to lift up the noseband and place it in your right hand. Then raise your right hand up towards your horse’s forehead slowly.
Once you’ve raised the bridle high enough that the bit is near your horse’s mouth, place your left hand under the bit. With the bit resting on your left hand, use your left thumb to open your horse’s mouth but gently pressing on the bars of the horse’s mouth.
The bars is the spot on your horse’s gums where there are no teeth and this is where the bit sits. When your horse opens his mouth, gently slide the bit inside and over the horse’s tongue. Use your right hand to raise the bridle a little higher so the bit does not fall out of the horse’s mouth, but be gentle.
Putting The Bridle Over Your Horse’s Ears
Next, put your left hand on the headstall of the bridle and use your right hand to gently bend your horse’s right ear forward and through the headstall. Then repeat this process on the left ear. Don’t pull the headstall back over both ears and bend them back toward the horse’s neck. This is very uncomfortable for your horse and will make less cooperative for future bridling.
Buckling Your Bridle
At this point, your horse should have the bridle on completely but none of the straps are attached. First, make sure your brow band is straight. Next, tuck the nose band in under the cheek pieces on both sides. Then, straighten the noseband! Once your brow band and nose band are straight you can start by buckling your noseband. Buckle the nose band tight enough that it won’t move but you should still be able to fit two fingers underneath it. If you can’t fit your fingers in, then you need to loosen it.
Next, buckle your throat latch. The throatlatch needs to be tight enough that it does not fall down to the horse’s cheeks but loose enough that it can move forward and back. You should also be able to put your whole hand in the throat latch. When the horse flexes during your ride, the throatlatch will make it difficult for them to breath if it is too tight.
Lastly, if your bridle has a curb chain, you’ll want to make sure it is completely flat. Once it is laying flat you will need to hook it under your horse’s chin to the left side of the bit. Make sure you can fit two to three fingers in the curb chain. It will tighten when the reins are pulled but does not need to apply pressure when the reins are slack.
I hope you’ve found this article helpful! If you did, please give it a share!
Don’t forget to check out these related posts!
115 Need To Know Horse Terms For Beginner Equestrians
Fall Riding Gear You And Your Horse Need!
How To Pick Up The Correct Diagonal At The Trot
Top 16 Reasons Your Kids Need Horses In Their Life
Recent Posts
As horse owners we want to provide the best possible care for our horses. And, sometimes our idea of what is best for the horse may not be what the horse wants. When it comes to turnout there tend to...
Thinking about buying a horse? In this article we'll discuss the seven reasons you need to do a pre-purchase exam before you seal the deal. If your heart is telling you that you've found the right...